Thursday, May 23, 2013

Welcome to the Studio!

Hi Crafters!
Anyone who reads my personal blog knows hubs and I bought a house last July and I finally have the perfect space to craft in!  Well, I decided to make a sign for my perfect space, and I'd like to share the creative process with you.  Sorry there are no videos, but I do have pictures of the creative phases.  Hope you enjoy, and if you have any questions, please feel free to email  or hit me up on Facebook!

So in this first photo, you can see all of the supplies I've pulled out for this project - some are things I know I will use, others are "maybe I'll use this, maybe not."

Supplies: 
Chipboard Cut Out - Melissa Frances
 Classic Flowers - Prima
Satin Ribbon - Stampin Up!
Ticket DieCut - Tim Holtz
Flocked Journal Cards - MME
Cardstock - Paper Source, Bazzill
Patterned Paper - Daisy D for Recollections Circa Fall 2007
It is important to note that most of the stuff in this project is from my very old stash from my days at Recollections before Michael's took the brand back in house.

So the first thing I had to do was attach the patterned paper to the front of the chipboard.  There are a few ways you can do this - since this is not a straight square or circle, I glued the chipboard to the paper and cut around with a exacto knife.  Took a little while, but I liked the way it came out.  Once your paper is trimmed and attached, sand the edges.  This way if you have any jagged or uneven cuts, you can smooth everything out.  Love this little trick.  Then you can cover up any "mistakes" with chalk or distress inks.

Once the paper was attached - I only did one side since the back will be against the door 100% of the time - you want to punch holes and fill these holes with Eyelets.  This is important mostly for ribbon.  In my case, I plan to attached a small chalk board later, so I did Eyelets at the top and bottom.  I used the large Eyelets and my Crop-o-Dile.  

Now if you notice, I have a set of holes closer together, and a set farther apart - the ones farther apart will eventually be attaching to a small chalk board. The holes that are closer together are for the ribbon that I am using to hang it. As you can see, there are also 2 pieces in the photo above, my studio has 2 doors - 1 sign for each door.  :) 

The next thing I did was cut out letters using my Cricut.  I cut out 1 1/2" letters using Ashlynn's Alphabet out of brown sparkly cardstock from Papersource and blue "bling" cardstock from Bazzill.      As you can see in the picture below, I used my Xyron "X" to adhere the letter layers together.

Once I got the letters stuck together, it was time to decorate the chipboard sign.  I cut a rectangle of patterned paper from another piece of paper from the Recollections line.  Then I glued down some brown lace along the bottom and laid down the word "Studio".  The top corner is a sticker from Glitz layered over 2 scalloped ovals cut from my Spell Binders dies.  The brown layer is actually the same size as the blue one, but it is cut in half and positioned so it looks like it's sort of nesting...neat trick eh?  Once that was in place I added "Jessi's" so the sign reads "Jessi's Studio".


 Once the top corner was laid out and the words put down, it was time for the fun part - embellishing!  I used kinds of flowers from my stash for this.  I glued in the leaves and larger roses.  Then, using a stylus tool, I pushed in flat flowers between, making them also look dimensional.  Also, if you look closely, you can see a ticket sticking out from behind the flowers...I could not find the booklet this ticket came from so I cut it in half and used one in each corner..love the way it came out, and I think I will remember this trick for next time.  Great way to save money on your embellishments!


The final step is to string ribbon through the top holes and hang it up.  Here is the completed sign!  To hang up your sign, you can get a 3M Command Hook - just make sure you get one to support the weight of your finished project.  I think the ones I have hold something crazy like 3 pounds.  My signs aren't that heavy, but I don not want them falling off the door either.  You can find them at WalMart, grocery stores, and any home improvement store.  I got mine at Lowes....after buying a new house, those people practically know us by name.  LOL!


Have you ever done a project like this?  Tell me about it!  I hope you enjoyed this project - it was loads of fun for me.  I've even made a second one for the other door - it has a few differences, but it's just about the same.  Hopefully I can get a studio tour done soon and you can see what they look like hanging up on my doors.
Is there something you want to see next?  Tell me about it!

Happy Scrapping, and I'll see you next time!
XOXOXOX
Jessi

Sunday, February 10, 2013

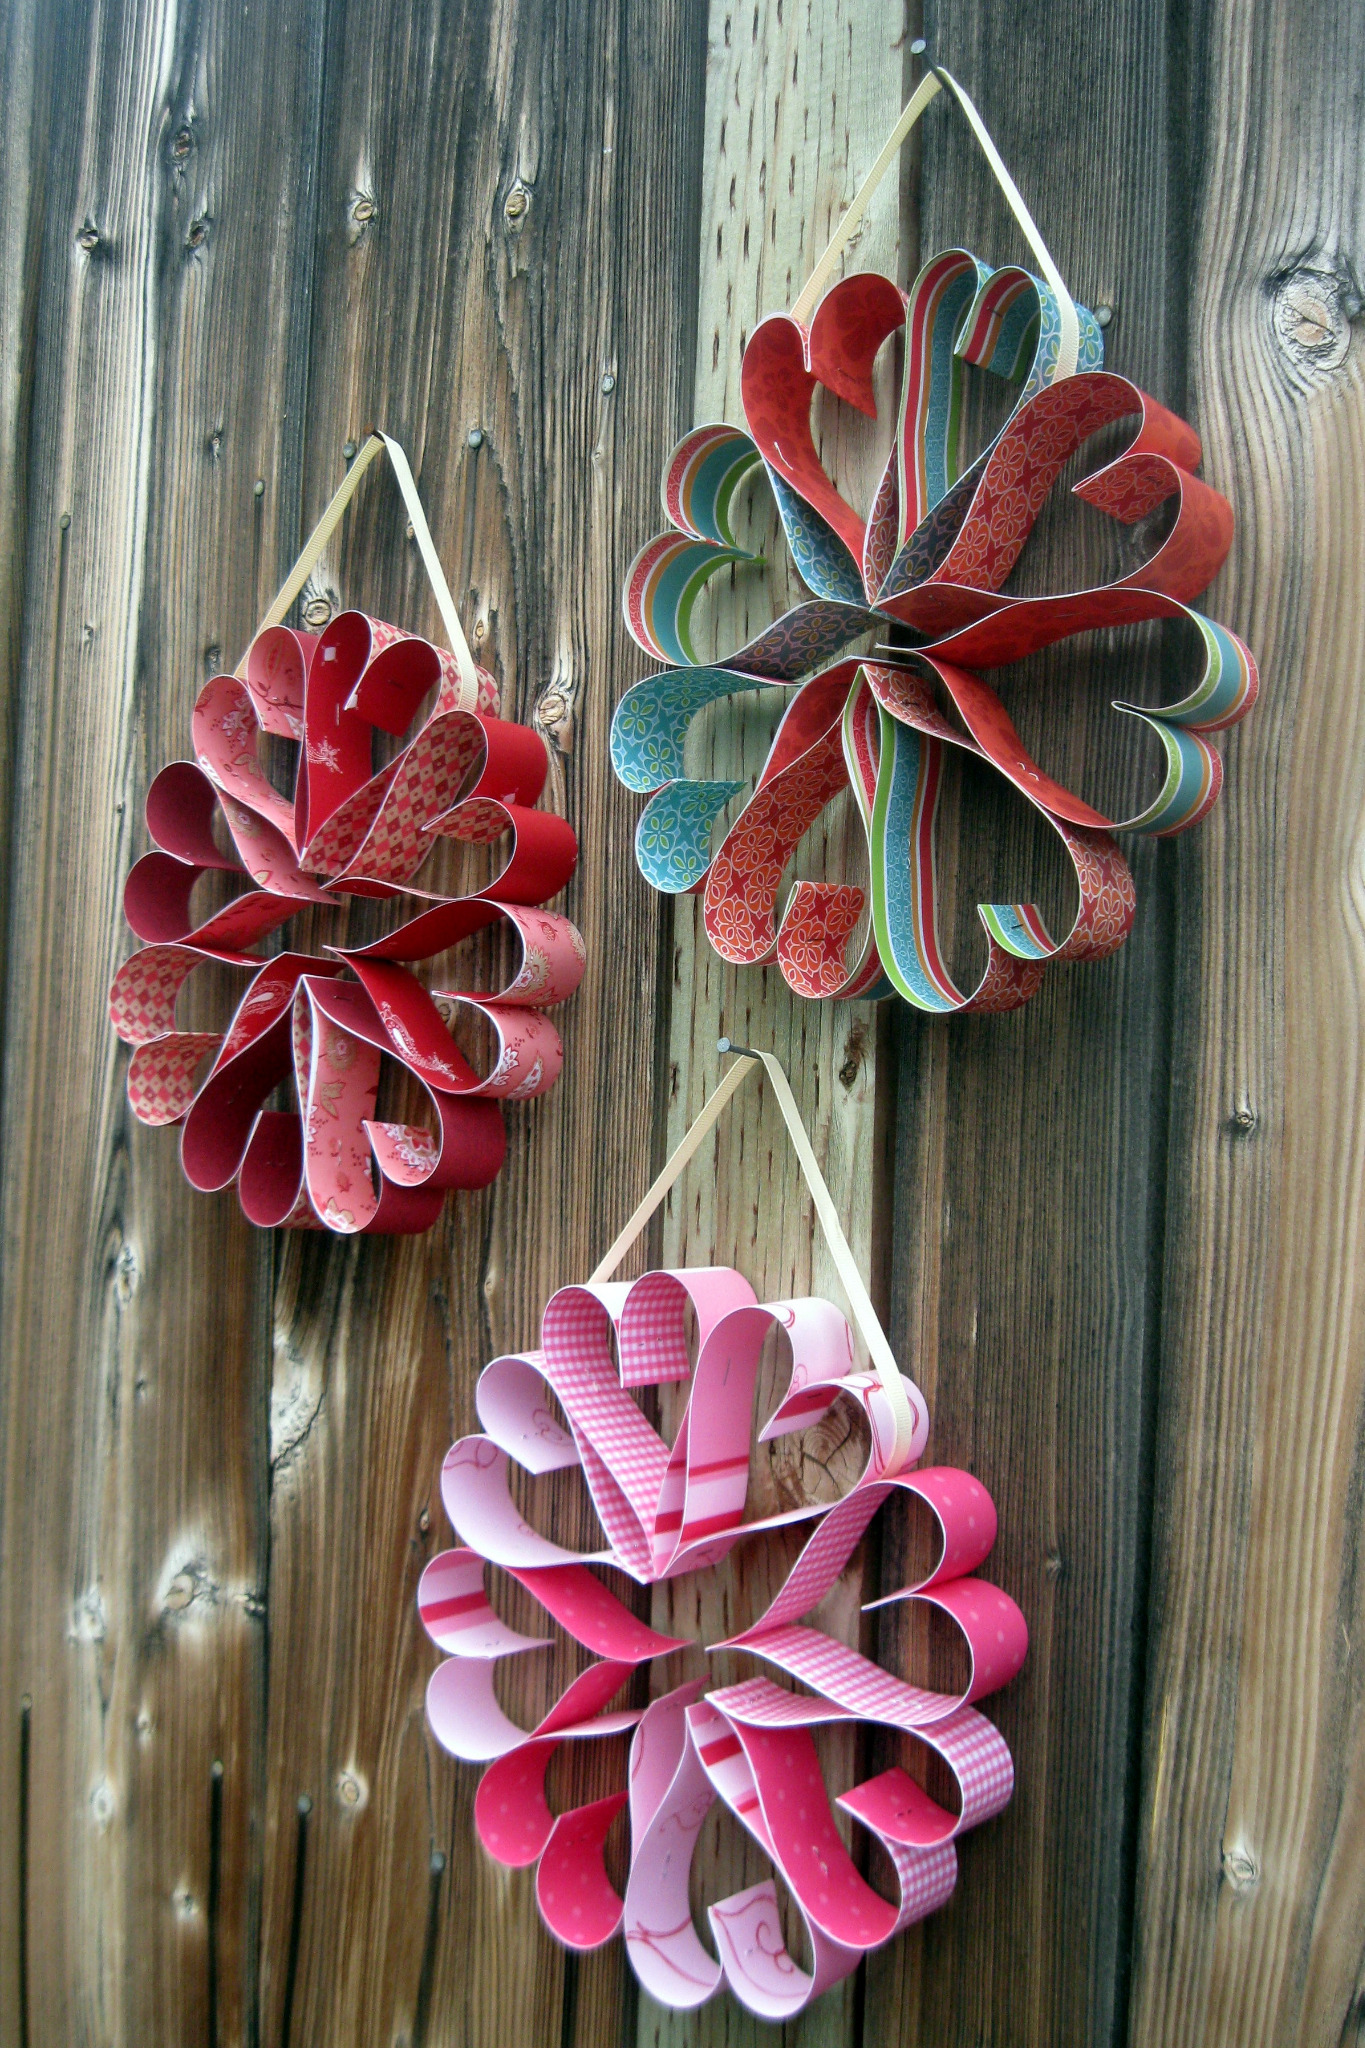
As Seen on Pinterest, Simple Heart Wreathe

Hello Crafters!

It seems settling in has taken me considerably more time than I expected, but good news is, I'm back and with a new project!

This project comes from Pinterest, courtesy of Frannie Dresham, the original pinner.  She found this great project on Twitter @FrugalDana - posted on her twitter on 2/10/2012.

I assumed this came from her blog, http://www.frugalfrontier.com (which is awesome), but I did not find any references or directions - truly my favorite kind of project....one I get to figure out myself. :)  SO I gave it a shot - not too difficult, I think.

The Wreathe itself is made of 8 paper hearts.  I've seen similar hearts in other projects I've seen on Pinterest so that was easy to figure out.  Now I needed to figure out how to cut the paper and the hanger, and then how to attach it all.  No problem! 

Here's what I did:

Supplies:
8 strips of cardstock - 12" x 1 1/2" 
Tiny Attacher (or stapler, glue dots, sticky strip, tacky tape or other strong adhesive)
1 piece of ribbon, 12" long
bone folder

Step 1: fold a strip in half.  If you are using a 2 sided cardstock, you want the inside of the fold to be the pattern or color you want on the outside of the heart.  Make sure to use your bone folder enforce your fold lines.

Step 2: Staple the folded end shut, just above the crease line.


Step 3: open your folded paper and pull the tails to a close, the inner pattern or color should now be showing on the outside, and you should see the makings of your heart.


Step 4: Staple the tails closed, securing the heart closed.


Step 5: Repeat for the 7 remaining strips until you have 8 hearts.


Step 6: Start constructing your wreathe.  Place the hearts side by side, matching the tails evenly at the bottom, and stapling the sides of each heart to the next one.  The staple will go approximately in the middle.

Step 7: Attach the hanger - before you close the wreathe (or, you can add the hanger when you first start connecting the hearts).  Staple one end of the ribbon to one side of a heart.  then wrap the ribbon over top of the same heart and attach to the middle of the other side, leaving a loop long enough to hang.


Step 8: Continue attaching remaining hearts until your wreathe is complete.


Isn't it pretty?  You can either stop here, or...

You can step it up a notch by adding an embellishment to the front of your wreathe.  Here I just diecut a heart - 2 1/2 inch heart from George on my Cricut - and glued it to the center using Beacons 3 in 1 glue.

 You can also watch me make this super easy project here:


I would love to see your projects and how you make this simple, but sweet wreathe your own.

If you'd like to see more projects form Pinterest, let me know or leave me suggestions.  I'd love to know what you think!

Happy Crafting!
Jessi Myers
xoxoxo

Sunday, July 8, 2012

Moving and Time Away

Hello Crafters!

I'm sure you've noticed there has not been an update in about a month - I'm still here, but I am going to have to be on hiatus for the next 2 months.  David and I have been house hunting, and we found one we love!  We hope to be moved in by the middle to end of August (just a few tweaks we need to do before moving in.) Once we are moved and settled I will be back with more crafting videos, ideas and inspiration.

In fact, I am working on some great sketches for cards and scrapbook pages, as well as planning some great mini albums.  So be sure to come back in mid September to see where we're at.
Until then, I'll still be popping on to post links to some crafty inspirations I've seen on You Tube.

Happy Crafting and I'll see you all again soon!
Hugs!
Jessi

Tuesday, June 5, 2012

Back From the Convention!

Hi Crafters!  I am back from the GASC and wow was it awesome!  Lots of shopping and lots of awesome classes.  Our weekend started with Shabby Chic cards from Melissa Frances - what a great class!


I will be posting other projects from the convention throughout the next few weeks so stay tuned to see all the fun stuff!

Now on to this week's tutorial. I am still working with the Madeline collection from Prima, but this week I am also working with my Circle Border punch from Fiskars....the one I just HAD to have a few summers ago. :D


To make today's card you will need the following:
 2 sheets of coordinating patterned paper
2 sheets of coordinating card stock
 Trimmer
Scissors
Circle die or die cutting machine
Circle border punch
Adhesive
Ribbon
Decorative label punch
Ink
Sentiment stamp

You can watch the video here, or you can follow the directions below.


1. Trim card base to 5x10 and fold in half. creating a 5x5 inch square card.
2. Trim patterned paper to a 4 7/8" square.
3. Trim a double point banner tip into the end and attach to the patterned paper square.
4. Adhere the patterned square and ribbon to the card base.   Secure the ribbon to the front of the card with a strip of tacky tape.
5. Die cut the coordinating card stock into a circle (4" or slightly smaller)
6. Cut a 4" circle out of the second piece of patterned paper and punch using the circle border punch and tape to the top of the card stock circle.

7. Using cardstock scraps in the same color as your card base, stamp your sentiment of choice and cut punch out using the decorative label punch.
8.  Cut another strip of cardstock 3/4" x 2 1/2" and trim the tips in a banner shape and attach to the back of the label punch, leaving tails hanging off either side.

9.  Attach the label and strip to the center of your circles.
10.  Use Foam Adhesive to attach the circles to the center of the front of your card.
That's it!  You just created a beautiful card perfect for any occassion.

I can't wait to see what you guys make!  And remember, if there is something you'd like to see or something you want to learn more about, hit me up - I'm always glad to do what I can to help!

Happy Crafting and I'll see you next week!
Hugs!
Jessi

Monday, May 28, 2012

A Challenge to You All!

Hi guys!  Sorry, there won't be a tutorial this week. Memorial Day weekend kept me pretty busy, and I will be gearing up over the next 2 days for the Great American Scrapbook Convention in Arlington, TX.  I promise to take lots of pics and fill you all in on the awesomeness on Sunday when I get back tho!

In the mean time, I have challenged myself to use some tools I bough way back when and just had to have.  I'm sure you all have one - what's yours?  Do you use it?  Tell me all about it!

I will be taking mine with me to the convention and working on creating something awesome and fun!  There will be a full tutorial on this project when I get back!  (And possibly a give away of goodies fresh from the convention) so stay tuned!

IN the mean time, let me leave you with a list of my favorite crafters on You Tube:

Kristen Wilson - http://www.youtube.com/user/LilsweetpeaVideos
Drew - http://www.youtube.com/user/Cardofmyeye
KWernerDesign Video: http://www.youtube.com/user/starofmay
Chic'n Scratch - http://www.youtube.com/user/ChicnScratch

There are quite a few more that I sub to, but these are my top 4 faves.  Stop by, check 'em out and show some love.  :)

Happy crafting and I'll see you next week!

Wednesday, May 23, 2012

Use Up Those Scraps!

Hi Crafters!
This weeks tutorial was inspired by two of my favorite Youtubers- Drew at cardofmyeye and starofmay.  They both did very similar cards and I just loved them both.  So much, in fact that I scrap lifted and combined the 2 designs in this weeks card.  Now I did not use my scraps for this card but it is a great way to use them up.  You'll see what I mean.

Before we get started let's gather our materials and tools:
- adhesive
-scissors
-Paper trimmer
- label punch or die
- corner rounder (the chomper or Fiskars squeeze punch if you got it.)
- ink blender tool and distress ink ( I used Walnut Stain)
- patterned paper-approx 4-8 coordinating patterns (I used the Madeline line by Prima)
- coordinating card base (I used Lagoon by Bazzill)
-White cardstock
-seam binding or other soft ribbon
- flowers or other small embellishments

You can follow along with this video tutorial, or you can follow the written instructions below.


Step 1:
Trim down your patterned papers into strips ranging in widths of 1/4" up to 3/4".

Step 2:
Trim white cardstock to a 3 3/4" x 5" rectangle and cover with adhesive.


Step 3:
Starting on the top left hand corner, place the strips of patterned paper over the white rectangle, letting the excess hang off the edges.  Line up each strip against the one before it until the entire surface is covered.


Step 4: Trim the excess papers around the edges leaving a beautiful diagonally stripped pattern.


Step 5:
Round the edges of the base card and the patterned rectangle


Step 6: ink the edges of the patterned rectangle and the card, and attach the rectangle to the top of the card.


Step 6: Cut a small slit at the upper right hand corner and tie on a length of seam binding.  Can tie a bow or a simple knot.


Step 7: Using your label punch or die, punch out a labeled image and rub on or stamp sentiment.  Ink Edges and attach to the card.  Decorate with any of your favorite embellishments.


Wasn't that fun!  Now tell me what you thought or show me what you did.

Can't wait to see your creations!

Monday, May 14, 2012

Quick Quotes Quick Page Kit

Hi Crafters!

Sorry about missing last weeks update - it's been a crazy couple weeks.  But I am back on track, and this week I've got something fun!  A Quick Page Kit from Quick Quotes. Now if you don't know about Quick Quotes, let me tell you about them.  They are an awesome scrapbook and papercraft company with some amazing papers, and even more amazing kits.  They have a monthly kit club, a wide variety of mini album and canvas project kits as well as some fun card kits.  Mom and I found them last year at the Great American Scrapbook Convention and fel in love with all of their awesome ideas and products.  We took 2 or 3 classes at the convention and bought several kits at their booth.  We also ended up going to their annual weekend event called Private Reserve.  I like to think of Private Reserve as papercraft boot camp.  It's a weekend long event that starts Friday (w/ bonus classes) and goes all the way through 5pm on Sunday.  Not including bonus classes you make a 20 page scrapbook album...yes, you actually complete 20 pages - and 6 other classes plus make and takes.  Additionally the do 4 Bonus Classes on Friday.   It was a truly awesome weekend - filled with fun, great prizes, and awesome give aways.  I walked out of their with 10 completed projects, 2 free canvas kits, and at least 6 other free page kits.  On top of that I won a copy of a very popular Canadian Scrapbook Magazine and a 9" Xryon Creative Station.  I haven't had a chance to use it yet with all the changes going on here, but believe me, it'll have a nice home in the new house. :)

Mom and I only signed up for a few of the bonus classes last year...this year we are all in!    Hope you can join us, or join them at any of their other Private Reserve locations around the country.  Want to know more about them, check them out!

Today's Video was going to be one of the page kits I got at Private Reserve this past year.  The papers are fun, the layout is simple, yet awesome.  Unfortunately my video editing software had other plans and combined clips from all sorts of stuff and deleted the second half of the video I spent so much time editing....Oh well.  I do have some great pics of the finished project.  So check out these pages, and then go check out Quick Quotes for even more awesomeness!!